Monday 5 March 2018

Finished Build: Custom 1953 Ford F-100 Pickup


Old-School Cool


If you read this earlier post, you will remember how much fun I had building the AMT Ford F-100 pickup as a tired, worn-out old work truck, and I said there must be so many more ways to build it using just the included parts. Well, I couldn’t resist building another one, and this time I used some of the custom parts to make an old-school custom truck.


The kit in question is again the Round2 reissue of the old AMT 1953 Ford F-100 Pickup, again purchased from Rochester Games & ModelsI summarised the kit contents in my earlier post but I will say again that the sheer choice of optional parts makes this kit so much fun. Quality is OK - it’s not the latest standard in terms of fit and detail, but you shouldn’t run into any serious problems anywhere. The tyre whitewalls are also supplied ready-done, which is nice.


This time I built the kit to recreate a 1960's custom machine, representing somebody’s faithful pickup truck which they have decided to turn into an eye-grabbing custom car. Just like with new cars, which go in and out of fashion over the years, so it is with modified cars: the custom cars being created today don’t look much like the ones being created in the 1980's, which in turn looked different to what custom cars looked like in the 1960's. In 1960's America, deep metallic paint on the body and chrome on everything else was very much the order of the day, and that’s what I have attempted to recreate with this kit. All the parts used are included in the box, from the bullet-shaped over-rider bumpers to the lovely chrome dished wheels. I lowered the suspension by simply removing a chunk from each of the spring mountings, giving the truck a tough-looking low-down attitude. I fixed the bonnet/hood shut, saving the engine for a future project.


I spent a great deal of time on the paintwork of this truck, knowing that flawless paint is key to a good 1960's custom car, and to be honest the result is not what I intended. I began by priming the body panels in white primer, followed by a good smooth coat of silver paint which I gently sanded/flatted to provide a smooth finish. I then applied a light coat of Ford Pepper Red metallic paint over the silver, hoping that this would give a custom or ‘candy’ look, followed by many coats of lacquer. This done, I gently wet-sanded the lacquer and polished it with some G3 cutting compound, followed weeks later by a buff with some genuine Meguiars Gold Class car wax. The end result? Basically metallic red paint, pretty much as it would have looked straight out of the can and without all the fuss! In some places, thanks to all my smoothing and polishing, the red has rubbed through revealing the silver beneath, which is a shame. Still, at least it is pretty smooth and I think the Ford Pepper Red, despite being new, suits the old truck well.  


The interior was left simple, with just a coat of white primer for the bench seat and dashboard, and matt black to simulate rubber matting on the floor. Sadly I somehow managed to smudge the inside of the windshield, probably while I was fixing the rear view mirror in place, but it isn’t too noticeable. There is also a flashy chrome gear lever in front of the seat, a typical 1960s custom touch. The wooden pickup bed was simulated my simply rubbing a thin smear of brown oil paint over silver paint.


This is one of my rare attempts to build a custom car model, and though it has turned out OK I could do with a lot more practice! This build has given me a whole new respect for model builders who turn out smooth, glossy, flawless customs. But overall, it was 100% fun to build and it will sit nicely alongside its worm out twin sister. I recommend this kit to anybody who wants to build a nice, simple custom truck with lots of options and ‘Ol'-Skool' looks!  


Sunday 30 July 2017

Finished Build: 1953 Ford F-100 Pickup


Somebody's Humble but Faithful Old Truck


There's something noble and respectable about a beaten-up, unassuming old vehicle which has served for decades with minimal care and very few 'Thank Yous' along the way. Commercial vehicles often survive further into old age than their passenger car cousins, simply because as long as they can continue to do a job and earn money, somebody will think it worthwhile to carry on running them. I think that's what happened with this truck.
 
 
I bought this kit, a Round2 reissue of the old AMT 1953 Ford F-100 Pickup, from Rochester Games & Models back in January during a spot of new year retail therapy. The kit is great fun - it is an old kit going back decades, but the general parts fit is OK (if you ignore the easily-removed flash) and the build options are just brilliant. The kit advertises that it can be built one of three ways (3-in-1 as the US kit manufacturers always used to say) but honestly, I think 30 ways is quite possible. 
 
 
I won't try to list every option, but overall the kit provides three sets of wheels, optional white wall tyres, two V8 engines, three exhaust setups, three grills, three types of bumper, plus all sort of optional items such as custom rear wings/fenders, marker lights, air horns, speakers and much more. The instructions stick to three specific builds - stock (factory original), service (like a modified working truck) or custom. Personally I can imagine mixing and matching all the parts to create some great builds, like a rat rod parts delivery truck, a retro custom truck or a hard-worked old beater, which is what I settled on for this build. I am planning to build at least a couple more versions though.


I built the truck with the hood/bonnet closed, saving the engines for use in a future project. I tried a new technique with this build in order to create the appearance of peeling and bubbling paint with rust or primer coats emerging. To do this, the majority of the parts were sprayed with red oxide primer straight from a Halfords aerosol can. Then, small bits of sea salt mixed with a little water were daubed onto the panels wherever I thought the paint would be flaking off. Given time to dry, this was then sprayed over with the pale blue top coat: again after drying time, the salted areas were rubbed to allow the salt lumps to break away, leaving the red oxide primer coat visible, together with some surface paint bubbling. Overall the effect is something similar to an old respray beginning to rust through and flake away from its primer coat, as might be the case with an old work truck which might have been crudely resprayed in somebody's barn. This technique is widely used and there are tutorials on YouTube if you fancy trying it yourself.


After getting the bodywork to look suitably worn, I added some of the included kit parts to the pickup bed to give the look of an old garage truck which is still used sometimes to go and weld new mufflers or silencers onto somebody's car, hence the oxy acetylene bottles and rusty exhaust parts lying in the back. The model spanners and wrenches were also included with the kit. I also put the spare wheel in there to add some character. The items in the bed, along with the road wheels and much of the chassis, were given either a oil paint wash, a brush with weathering powder or both.
 
 
Overall I strongly recommend this kit. It is old and the fit and finish are not up to the latest standards, but you will end up with a great fun model and lots of plans to build more!


Sunday 23 July 2017

Finished Build: Revell 1/25 Ford F-150 Flareside Pickup

Straight Out of the Box


I'm not sure what initially drew me to this kit in a local model shop (Rochester Games and Models): maybe it was childhood memories of seeing such pickups on TV and in films, maybe it was just because I thought it looked good. Anyway, during the winter I bought this Revell 1/25 scale Ford F-150 Flareside Pickup (dubbed Flareside in the US because the pickup bed is narrow and sits between the bulging rear fenders or wings), painted and lacquered the bodywork, then left it aside. Cut to last weekend, and after completing a Kenworth truck kit (read more here) I decided to get the painted body out and finish the kit.


This is a slightly strange vehicle to British eyes. The 1980s squared-off cab and hood sit in front of a 1950s-style flareside or stepside body. The truck is also a 4x4: my guess is that Ford created this model as a sort of sporty truck for people who like an outdoor lifestyle, a bit like car manufacturers do these days with their numerous SUV models.
 
I quite like the look of the finished truck, but the kit itself is not a particularly well detailed one. For example, the model lacks a bulkhead or firewall at the rear of the engine bay, leaving an open gap. It also lacks inner wings or wheel arch liners at the front, so you can see the untidy meeting of chassis and interior components behind the wheels. The lack of a correct engine bay led me to choose not to model the engine and to seal the bonnet or hood closed.
 
 
The kit includes quite a nice set of decals in dark grey which recreate the original factory side panels on the cab and bed. After spraying the bodywork with silver auto paint, I applied the side panel decals and over-sprayed the whole lot with clear gloss lacquer. This has given a reasonably good finish, though quite honestly I did not get a good enough finish with the silver paint so some areas look a little dark or mottled. Also, in places I could not the get the large decals to sit flat on the bodywork, and where they stand a little proud they have cracked or stretched. Ultimately I began to realise that this model was not going to turn out to be a masterpiece, so I stopped worrying about all these things and just got on with finishing it!


The interior was sprayed with Humbrol dark red in a satin finish, with the seat panels given a coat of matt lacquer to give the impression of fabric inserts with vinyl surrounds, along with the carpet. The coloured interiors of American cars in this period have always fascinated me, which is why I decided to go with a dark red interior instead of black or grey or something more European. The kit also includes a nice set of off-road style wheels with nice big rubber tyres, which really look the part.
 
Overall, I would not say that this kit is a must-have, but even given a quick build turnaround it can still be made to look good enough to go on your shelf. 


Sunday 16 July 2017

Finished build: Revell 1/25 Kenworth Aerodyne


Snap Decision? An old snap-kit got me back into building trucks
 
 
Despite spray painting several body shells ready for building, I had not completed a kit build since last year. After a trip to the US, which happily involved stopping off at a branch of Hobby Lobby, I picked up a couple of truck kits and voila - here is a completed model from that enjoyable stop. Below is a short video I made showing the kit in its unbuilt state.
 
 
The kit in question is the Revell 1/25 scale Kenworth W900 Aerodyne. This is actually an old snap-kit, in other words a simplified kit designed to be completed without the need for glue, and targeted mainly at younger modellers and perhaps modellers who prefer a simpler building process. Though no longer marketed or labelled as a snap-kit, many of the parts can still be assembled with nothing more than a firm 'snap', and some of the major sub assemblies, like the chassis/frame, are in one piece.


This is a reason I chose this truck as my next project. After spray painting the one-piece cab and sleeper body, plus the one-piece hood/front fenders assembly, the actual build was completed during a few hours over two weekends and a few evenings. After not finishing a build for so long, my main aim was to simply get something finished!


I spray painted most of this kit. The cab and sleeper, hood and fenders, frame, interior and most other components were sprayed either as individual parts or as built-up sub-assemblies. The white stripe decals were applied over the blue base coat before over-spraying the cab unit with clear gloss lacquer. The diesel tanks suffered the usual fault of being made in halves then chrome-plated, leaving an unsightly join line if assembled as made, so I glued the halves together, sanded the join lines, then sprayed them with enamel silver paint and brushed some Pledge floor wax onto them to hopefully get close to a natural metal finish. The chromed cab steps/battery boxes were brushed with matt lacquer to make them again look more like bare metal. The real trucks seem to have a mixture of chromed or polished parts, such as the wheels, exhaust stacks and bumper, with duller aluminium and unpolished stainless steel parts like the diesel tanks and steps. This was the look I decided to go for. I left the grill surround in chrome finish, then matted the grill mesh before giving it a wash with dilute black oil paint. This approach was also used elsewhere to highlight some of the details and tone down the bright work.  


Once assembled, I gave the chassis, tyres and lower parts of the truck a subtle brush with some sand-coloured weathering powder to give the impression of a life at work on dry roads. This is supposed to represent a clean and well-kept truck, but I feel it benefits from some dust to bring out the details and make it a little less 'new'.


This kit is available now in the UK for about £25 and in the US for about $25, so I really recommend it as a nice simple build which costs little and will display nicely.


Monday 6 June 2016

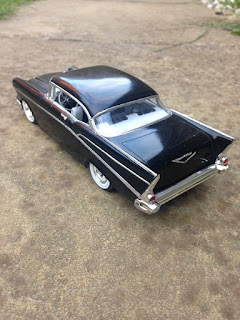
'57 Chevy Custom

It has been quite a while since my last update, but believe it or not things have been happening in the workshop. The most recent project off the bench is this, a mild-custom 1957 Chevy Bel Air Coupe.


After project Charger a couple of years ago - see this post - I promised my friend Chris that I would build a car for his birthday, rather than just give him a gift that he might not really want. He took me up on the offer and requested a black 1957 Chevy with a subtle custom touch. As luck has it, I already had the good old AMT '57 Chevy Coupe kit in my stash of unbuilt models, so I got straight to work.


Chris wanted it black, mean and subtly customized without being too radical. That approach is right up my street so I got busy and sprayed the body shell with a few light coats of Halfords white plastic primer, which was gently sanded before a good few coats of BMW Jet Black paint . This is not a metallic colour, so no lacquer was required and I was able to polish up the colour coat with a cloth and some G3 cutting compound to give it a showroom finish.


Work then commenced on the interior, which was finished in a factory original black and white scheme simply by coating the interior with white primer, then brush painting the black carpet and seat inserts. The seat buttons and instrument bezels were finished with a silver gel pen to give the appearance of chrome details.


After deciding that the engine bay in this kit (which dates from the 1960s) was not sufficiently detailed, plus that the lowering job on the front end would make it hard to make a believable engine bay, owing to the model's simple axle arrangement, I decided to seal the engine bay shut and not add a detailed engine. This also allowed me to present Chris with a model which has a nicely fixed bonnet, or hood, which will not keep falling off!

The kit makers, AMT, provided fairly good chrome-plated front grille and rear bumper assemblies which to my eyes look pretty nice, despite having some mold lines at either end. The grille was given a black wash and the Chevrolet badge was brush painted in the correct colours. The tyres, whichwere provided in black vinyl, were given nice white walls using a white paint marker, cheaply available from craft shops.

I first built AMT's '57 Chevy kit back when I was at school, and I must say I enjoyed it just as much this time, 20+ years later. It includes some nice 1960s speed and custom parts and is great fun, plus it looks like a '57 Chevy when it's built. Add one to your stash if you see one for sale.

Tuesday 6 January 2015


Bedford O Type - finished

It’s been a while since I updated this blog, for two reasons: 1) in the autumn I moved home, so there was a break in my modelling activities, and 2) the project I undertook between moving and Christmas was to build a Christmas present for my dad – and I didn’t post any updates in case he saw them!

My dad worked on a farm in the 1960s, and before that he spent much of his time amongst  local farm workers and relatives who worked on the land, as did many people in southern Lincolnshire. It’s no surprise that he retains an affection for the tractors and lorries that featured on the farms of the day, and I was sure he would like a model of a typical farm lorry. He drove some lorries himself, but sadly no models of those types have been made. However, he has always been fond of the Bedford O type, a typical 1940s – 1950s light lorry, and kit makers Emhar make a kit of that very vehicle.


The kit was only released in the mid-2000s and as such, is modern in design and very high quality. All parts are moulded in light grey – the preference of most modellers- and are crisp and clean. My only criticism is that some smaller parts are held onto the sprue/frame with very thick gates (joining points), sometimes making it hard to remove the parts without damaging them. Aside from that, I cannot fault the quality of the parts. Even the numerous lugs which form the hinges for the tailboard and dropsides are provided as separate parts, and as a result look great on the model.


The kit features a detailed engine (a 3.5 litre petrol engine in a truck, those were the days!) and the bonnet and bonnet sides all allow for the engine to be on display, if you wish. I don’t go for the open-bonnet look usually, unless the engine is something spectacular, so I built and simply painted the engine and left the engine compartment closed. The most awkward part of final assembly was the grill and front wings: with the wings attached as per the instructions, I found there was too little space to fit the grill,  so had to file away some of the lower grill surround. This also affected the fit of the bonnet sides, but overall that lovely Bedford ‘face’ still looks right.


When it came to assembling the rear body, I added the tailboard, side pillars and headboard and decided that was enough – it looked like the kind of farm lorry I wanted to make. I tried fitting the dropsides later to see how they looked but found that they needed to be assembled together with the other body parts in order to fit well, so I happily left them off.


The Bedford was sprayed using easily available aerosol cans: Humbrol red for the cab and body, Humbrol satin black for the chassis, and Plasti-Kote gloss black for the wings. The kit is intended to be made as either a British Railways or British Road Services lorry, which wasn’t quite what I wanted, so naturally I chose not to spray the model in either colour scheme or use the respective decals. Paint is of course only the first step in finishing a model, and I complimented the paint job with some subtle washes to bring out the details, and some dry weathering powders – especially on the ‘wooden’ load bed –to suggest accumulated earthy dirt.

Overall I would recommend the Emhar Bedford to anybody with a soft spot for old lorries.

Sunday 28 September 2014

On the Bench: Citroen 2CV Part 4 (Finished)


The simple Revell Citroen 2CV project I started while waiting for my house move to go through is finally done.
 
Last time in Part 3, the 2CV’s main assemblies were fitted together leaving me with a recognisable, but still unfinished, 2CV. Over the last couple of days I have finished assembly (this was just a case of fitting the glazing, bumpers, roof and trim parts) and applied some weathering to make the car look how I wanted: a used and probably much-loved but rather uncared-for old 2CV that might still be in use somewhere in deepest France.


As had been the case throughout the build, the last few pieces went together very well and fitted nicely. It is easy to forget that things like door handles and windscreen wipers were commonly moulded in place as part of the body shell on older car kits, and the improvement in the finished model thanks to the use of separate parts for such things in this kit is apparent.


The only thing I’m not really happy with is the lights. Firstly, I used Revell ‘clear’ colours for the amber indicator and red rear light lenses, and it really isn’t as effective as the Humbrol clear paint I normally use. Secondly, I was concerned that the headlamp reflectors looked a little too dark, as the chrome plating applied during manufacture had not coated the insides of the light reflectors very well. I brushed some silver paint into the headlight reflectors to try to improve it, but after fitting the clear lenses I still think the headlights look too dark.


On the other hand, this was my first time using Humbrol’s new washes and weathering powders, and I am pretty happy with the result. I wanted the wheels and bodywork to look used and to show an accumulation of dirt together with a suggestion of rust, and though it’s not a show winning job the end result is just about what I wanted. Dark grey wash was used to darken the panel gaps and to make a dark stain beneath the fuel cap to suggest fuel spills, and rust wash was applied sparingly along the door bottoms, beneath the windscreen and under the bonnet sides. Dust was then brushed gently along the lower panels and bumpers.


Overall I'd recommend this kit. There are various ways to build it - a smart Charlston edition like the kit was designed to be, an old hack like the one I have built, or perhaps a racer or a family car loaded down with groceries or luggage. Quality is good and you should encounter no real issues with this kit.